<Spring Security> 9. REST API 로그인 만들기(2)
by BFine
가. Custom AuthenticationFilter 만들기
a. JSON 처리는 어떻게?
- 이전 포스팅에서 UsernamePasswordAuthenticationFilter 를 그대로 사용하여 커스텀 API 로그인을 만들어 보았다.
- 한가지 문제점은 JSON 형태로 처리가 되지않기 때문에 그대로 사용하기에는 아쉽기 때문에 AuthenticationFilter를 만들어 보았다.
b. AbstractAuthenticationProcessingFilter
- 이 클래스는 UsernamePasswordAuthenticationFilter 의 super 클래스로 이 Filter를 상속받아 만들면 간단하게 구현할 수 있다.
public class JsonIdPwAuthenticationFilter extends AbstractAuthenticationProcessingFilter {

    protected JsonIdPwAuthenticationFilter(RequestMatcher requiresAuthenticationRequestMatcher) {
        super(requiresAuthenticationRequestMatcher);
    }

    @Override
    public Authentication attemptAuthentication(HttpServletRequest request, HttpServletResponse response) throws AuthenticationException, IOException {

        if (!request.getMethod().equals("POST")) {
            throw new AuthenticationServiceException("Authentication method not supported: " + request.getMethod());
        }

        Map<String, Object> parseJsonMap = parseJsonMap(request);

        String id = (String) parseJsonMap.get("id");
        String pw = (String) parseJsonMap.get("pw");

        UsernamePasswordAuthenticationToken authRequest = new UsernamePasswordAuthenticationToken(id, pw);

        return super.getAuthenticationManager().authenticate(authRequest);
    }

    private Map<String, Object> parseJsonMap(HttpServletRequest request) throws IOException {
        String body = request.getReader().lines().collect(Collectors.joining());
        GsonJsonParser gsonJsonParser = new GsonJsonParser();
        return gsonJsonParser.parseMap(body);
    }
}
- JSON을 parse하는 방법은 여러가지가 있는데 ObjectMapper가 가장 간단하지만 예제에서는 Gson을 이용해 보았다.
- 코드를 보면 알수 있듯이 username, password 가 아닌 id, pw로 파라미터명을 지정해줄 수 있다.
- Config에는 아래와 같이 설정해주었다.
@RequiredArgsConstructor
@EnableWebSecurity
public class SecurityConfig extends WebSecurityConfigurerAdapter {

    private final UserDetailsService userDetailsService;
    private static final RequestMatcher LOGIN_REQUEST_MATCHER = new AntPathRequestMatcher("/api/v1/login","POST");

    @Override
    protected void configure(HttpSecurity http) throws Exception {

        JsonIdPasswordAuthenticationFilter jsonAuthenticationFilter = new JsonIdPasswordAuthenticationFilter(LOGIN_REQUEST_MATCHER);
        jsonAuthenticationFilter.setAuthenticationManager(authenticationManagerBean());

        http.csrf().disable();
        http.addFilterAt(jsonAuthenticationFilter,UsernamePasswordAuthenticationFilter.class);
        http.userDetailsService(userDetailsService);
    }

    @Override
    public void configure(WebSecurity web){
        web.debug(true);
    }
}
나. Custom AuthenticationToken 만들기
a. UsernamePasswordAuthenticationToken
- AuthenicationToken은 인증 정보(유저이름, 비밀번호, 권한목록)+request를 들고 있는 객체라고 생각하면 된다.
- 위에 만든 부분을 보면 이 Token 보이는데 이부분은 UsernamePasswordAuthenticationFilter에서 그대로 가져온 부분이다.
- 코드를 보면 간단하게 principal 유저정보객체, creadentials는 유저비밀번호로 보여진다.
- 그리고 두개의 생성자가 보이는데 주의할 부분은 javadoc에도 나와있지만 두번째 생성자는 AuthenticationManger나 AuthenticationProvider에서만
사용한다고 써져있으니 조심해야한다!! => 이 Token을 생성할때는 인증처리가 되지않았는데 authenicatied가 ture가 될 수 있기 때문이다.
- 이 Token이 상속하고 있는 AbstractAutehticationToken을 살펴보면
- 보면 권한관련 부분은 수정하지 못하도록 unmodifable로 처리하는 디테일을 살펴볼 수 있다.
b. AbstractAutehticationToken
- 위의 AbstractAutehticationToken 을 상속받아 Custom Token을 만들어보았다.
=> UsernamePasswordAutehticationToken을 거의 그대로 가져와도 무방하다.
@EqualsAndHashCode(callSuper = false)
public class IdPwAuthenticationToken extends AbstractAuthenticationToken {

    private static final long serialVersionUID = SpringSecurityCoreVersion.SERIAL_VERSION_UID;

    private final String id;

    private String pw;

    public IdPwAuthenticationToken(String id, String pw) {
        super(null);
        this.id = id;
        this.pw = pw;
        setAuthenticated(false);
    }

    @Override
    public Object getCredentials() {
        return this.id;
    }

    @Override
    public Object getPrincipal() {
        return this.pw;
    }

    @Override
    public void eraseCredentials() {
        super.eraseCredentials();
        this.pw = null;
    }
}
- 간단하게 String 형태로 구현했지만 추가적으로 객체형태로 다양한 정보를 가지고 있도록 하는 것도 가능하다.
- 그리고 이제 AuthenticationFilter쪽도 수정해보면
public class JsonIdPwAuthenticationFilter extends AbstractAuthenticationProcessingFilter {

    protected JsonIdPwAuthenticationFilter(RequestMatcher requiresAuthenticationRequestMatcher) {
        super(requiresAuthenticationRequestMatcher);
    }

    @Override
    public Authentication attemptAuthentication(HttpServletRequest request, HttpServletResponse response) throws AuthenticationException, IOException {

        if (!request.getMethod().equals("POST")) {
            throw new AuthenticationServiceException("Authentication method not supported: " + request.getMethod());
        }

        Map<String, Object> parseJsonMap = parseJsonMap(request);

        String id = (String) parseJsonMap.get("id");
        String pw = (String) parseJsonMap.get("pw");

        IdPwAuthenticationToken idPwAuthenticationToken = new IdPwAuthenticationToken(id,pw);
        idPwAuthenticationToken.setDetails(super.authenticationDetailsSource.buildDetails(request));

        return super.getAuthenticationManager().authenticate(idPwAuthenticationToken);
    }

    private Map<String, Object> parseJsonMap(HttpServletRequest request) throws IOException {
        String body = request.getReader().lines().collect(Collectors.joining());
        GsonJsonParser gsonJsonParser = new GsonJsonParser();
        return gsonJsonParser.parseMap(body);
    }

}
- 단순히 AutenticationToken을 변경해주었고 그리고 아래에 .setDetails는 HttpSerlvetRequest의 Holder로 감싸서 Token에도
request에 대한 정보를 가지고 있도록 저장하는 부분이다.
c. 중간점검 테스트 !!
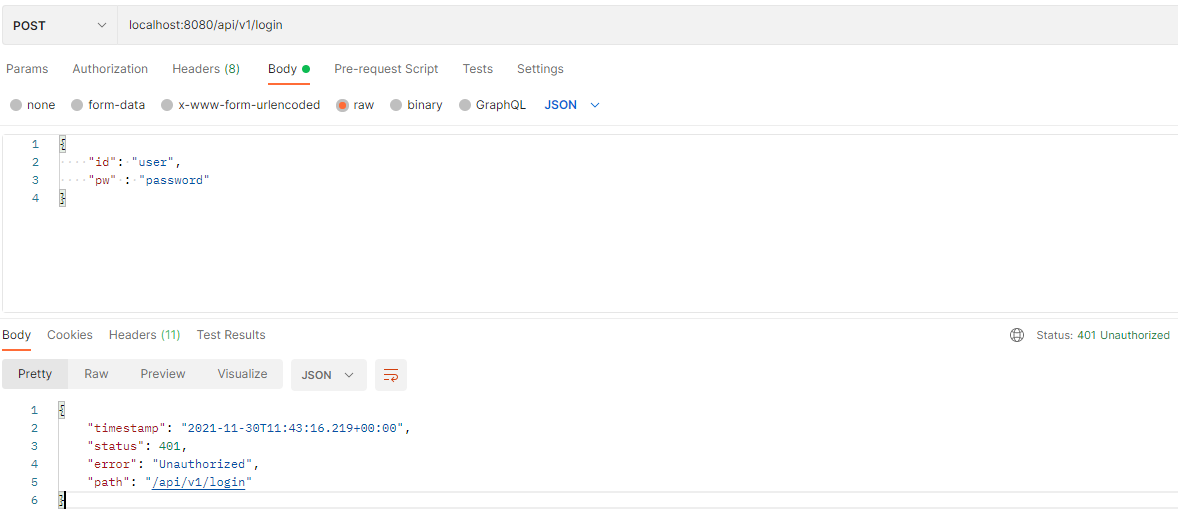
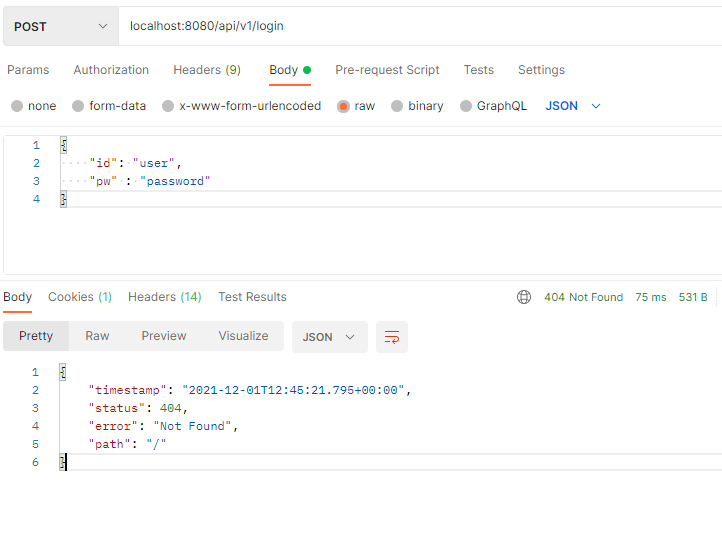
- PostMan으로 지금까지 처리했던 부분을 API 테스트 해보면 401 에러가 발생한다.
- 처음에는 권한 오류일까 했는데 지금까지 했던 코드에 권한처리 부분은 없기 때문에 디버그를 해서 천천히 따라가보니
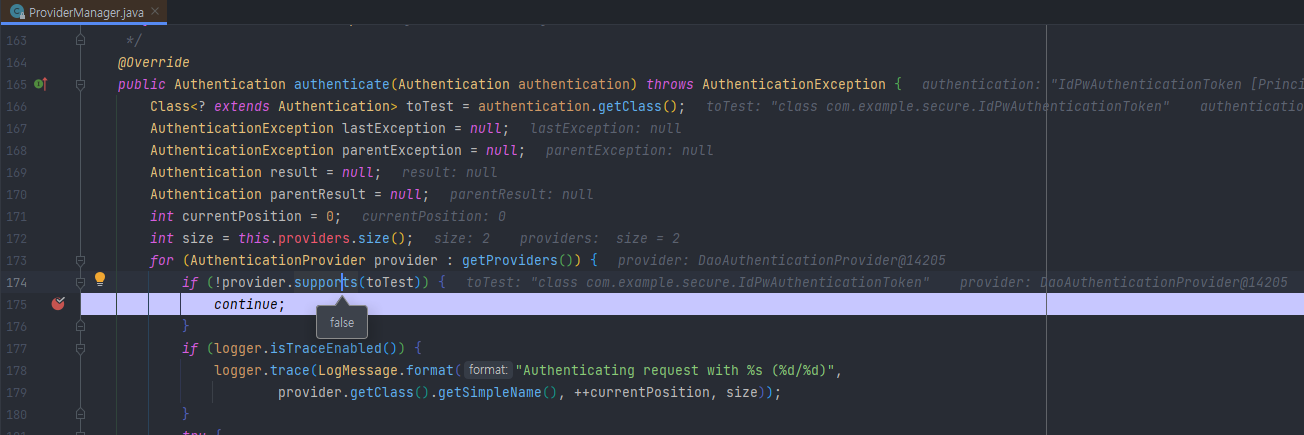
- 보면 DaoAuthenticationProvider에서 support 하지 않기 때문에 패스처리 되어서 오류가 발생했던 것이다.
- 즉 Token을 새롭게 만들면 이에 처리할 수 있는 AuthenticationProvider도 만들어야 한다는 의미가 된다...

다. Custom AuthenticationProvider 만들기
a. AuthenticationProvider
- 먼저 interface인 AuthenticationProvider의 코드를 살펴보자
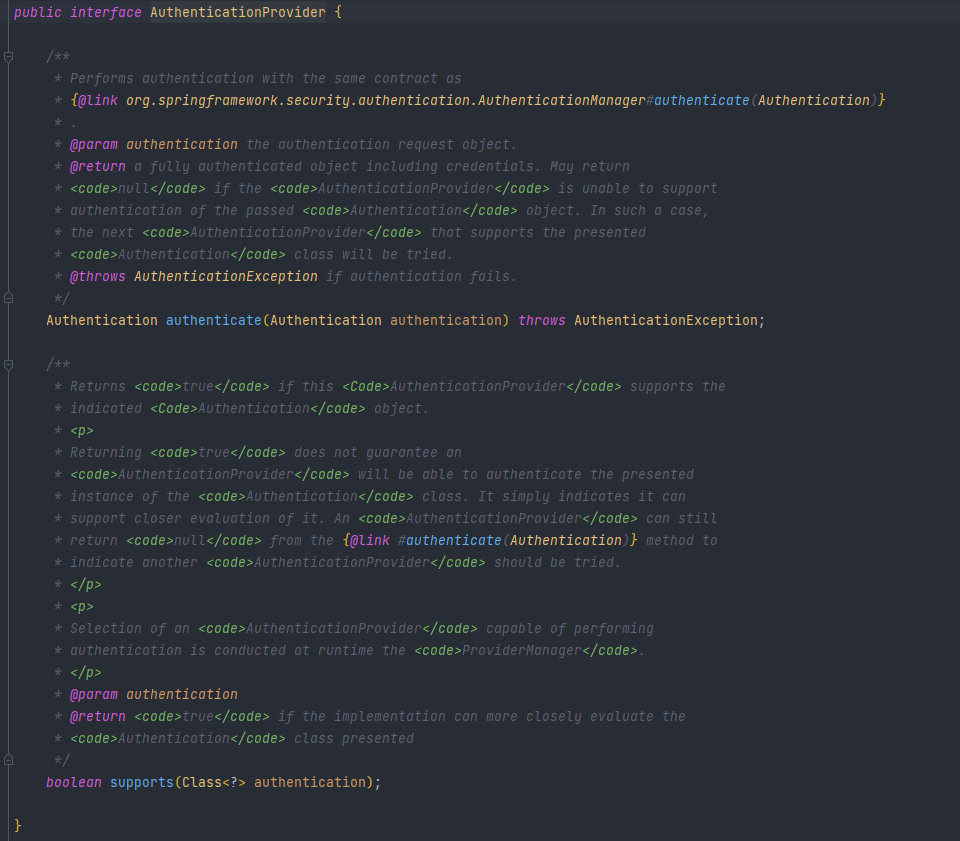
- 아래 메서드는 위에서 정리한 부분이고 .authenticate가 핵심 인증처리를 진행하는 메서드라 보면 된다. 여기서 UserDetailsService를 통해
DB에 있는 유저정보를 불러오고 이 AuthenticationProvider에서 비밀번호 비교 처리를 하는 부분이라고 보면된다.
b. AbstractUserDetailsAuthenticationProvider
- 이 추상클래스는 UserDetails 기반으로 하며 UsernamePasswordAutehticationToken를 support하는 AuthenticationProvider이다.
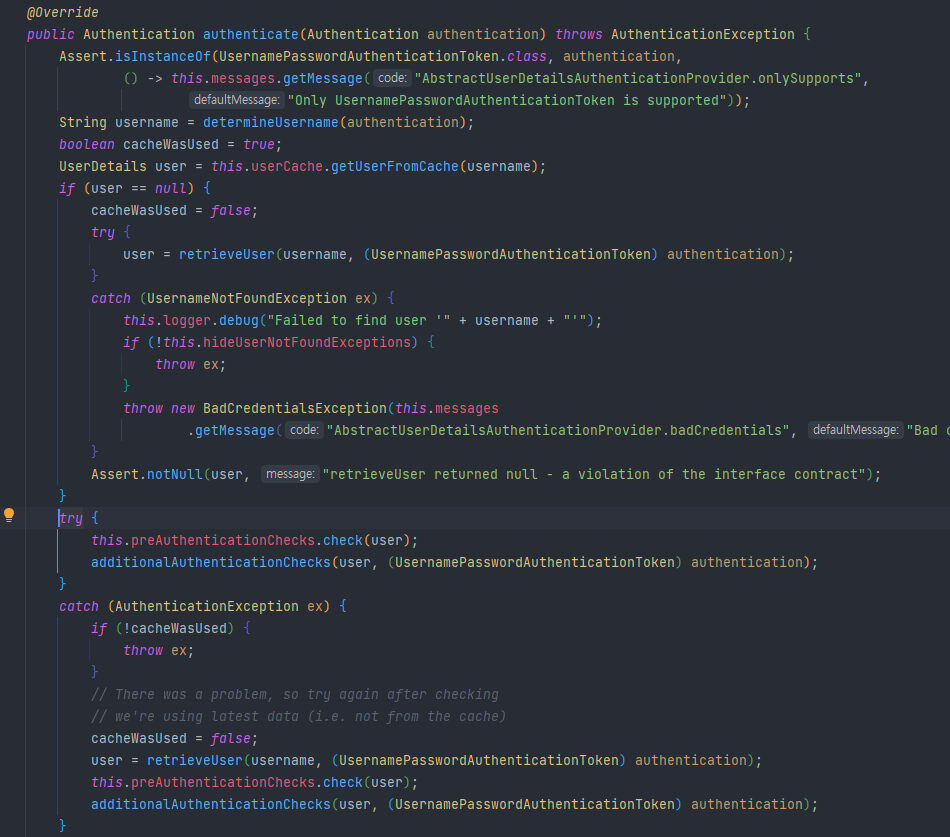
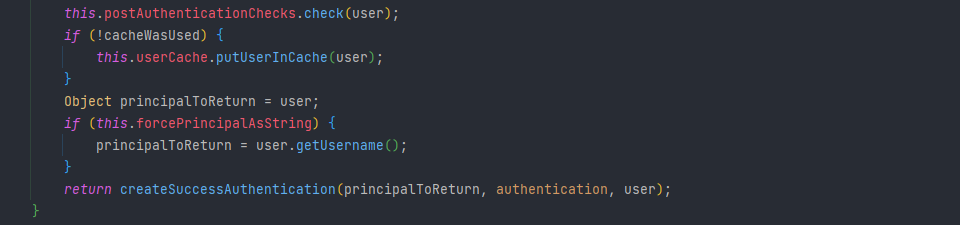
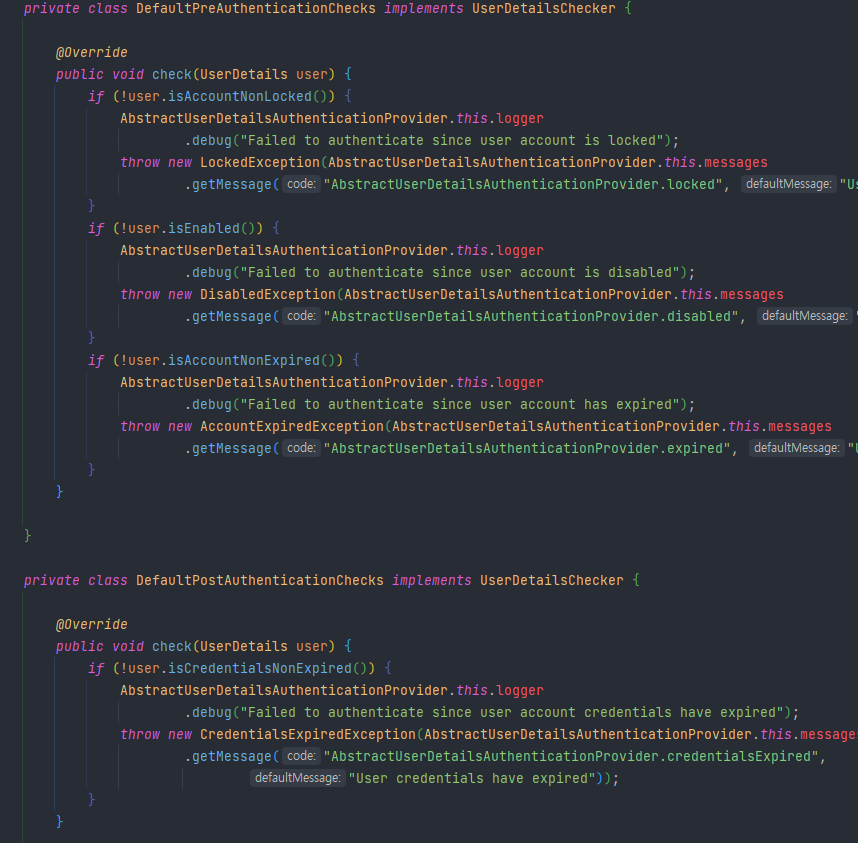
- 코드를 보면 캐시하는 부분도 있고 보면 UserDetails에 대해 유효성 체크를 전후로 하고 있는 것을 볼수있다.
=> 캐시하는 부분은 NullUserCache로 되어있는데 따로 사용하는 클래스도 없고 유저정보를 캐시하는게 이점이 있을까라는 생각이 들었다.
- 이렇게 보니 공부 목적이 아니라면 이렇게 잘짜여있기 때문에 굳이 Custom 클래스들을 만들 필요는 없는 것 같고
UsernamePasswordAutehticationToken과 DaoAuthenticationProvider를 그대로 사용해서 만드는게 가장 좋은 방법이 아닐까라는 생각이 든다.
c. Custom AuthenticationProvier
@RequiredArgsConstructor
public class IdPwAuthenticationProvider implements AuthenticationProvider {

    private final UserDetailsService userDetailsService;
    private final PasswordEncoder passwordEncoder;
    private final GrantedAuthoritiesMapper grantedAuthoritiesMapper;


    @Override
    public Authentication authenticate(Authentication authentication) throws AuthenticationException {
        String userId = String.valueOf(authentication.getPrincipal());
        UserDetails userDetails = userDetailsService.loadUserByUsername(userId);

        if(!this.passwordEncoder.matches(authentication.getCredentials().toString(),userDetails.getPassword())){
            throw new BadCredentialsException("AbstractUserDetailsAuthenticationProvider.badCredentials");
        }

        IdPwAuthenticationToken certifiedToken = new IdPwAuthenticationToken(userDetails.getUsername(),
                userDetails.getPassword(),grantedAuthoritiesMapper.mapAuthorities(userDetails.getAuthorities()));

        certifiedToken.setDetails(authentication.getDetails());

        return certifiedToken;
    }

    @Override
    public boolean supports(Class<?> authentication) {
        return (IdPwAuthenticationToken.class.isAssignableFrom(authentication));
    }
}
- 간단하게 기본적인 부분만 만들어 보았다. UserDetailService에서는 UserDetails(유저정보)를 DB에서 가져오고 비밀번호가 일치하는지 확인한다.
- 요청 비밀번호가 DB 정보와 일치하면 인증이 된 것이므로 가장 중요한 부분인 인증된 AuthenticationToken을 새롭게 발급해야한다.
@EqualsAndHashCode(callSuper = false)
public class IdPwAuthenticationToken extends AbstractAuthenticationToken {

    private static final long serialVersionUID = SpringSecurityCoreVersion.SERIAL_VERSION_UID;

    private final String id;

    private String pw;

    public IdPwAuthenticationToken(String id, String pw) {
        super(null);
        this.id = id;
        this.pw = pw;
        setAuthenticated(false);
    }

    public IdPwAuthenticationToken(String id, String pw, Collection<? extends GrantedAuthority> authorities) {
        super(authorities);
        this.id = id;
        this.pw = pw;
        setAuthenticated(true);
    }

    @Override
    public Object getCredentials() {
        return this.pw;
    }

    @Override
    public Object getPrincipal() {
        return this.id;
    }

    @Override
    public void eraseCredentials() {
        super.eraseCredentials();
        this.pw = null;
    }
}
- 이를위해 추가로 생성자를 만들어 인증이 된 Authentication이라는 것을 저장하기위해 .setAuthenticated 메서드에 ture로 처리해야한다.
- 그리고 이 생성자를 이용해서 새로운 AutheticationToken을 발급하도록 설정해주었다. (Config 설정은 아래와 같이 변경)
@RequiredArgsConstructor
@EnableWebSecurity
public class SecurityConfig extends WebSecurityConfigurerAdapter {

    private final UserDetailsService userDetailsService;
    private static final RequestMatcher LOGIN_REQUEST_MATCHER = new AntPathRequestMatcher("/api/v1/login","POST");


    @Override
    protected void configure(AuthenticationManagerBuilder auth){
        auth.authenticationProvider(new IdPwAuthenticationProvider(userDetailsService,PasswordEncoderFactories.createDelegatingPasswordEncoder(),new SimpleAuthorityMapper()));
    }

    @Override
    protected void configure(HttpSecurity http) throws Exception {

        JsonIdPwAuthenticationFilter jsonAuthenticationFilter = new JsonIdPwAuthenticationFilter(LOGIN_REQUEST_MATCHER);
        jsonAuthenticationFilter.setAuthenticationManager(authenticationManagerBean());

        http.csrf().disable();
        http.addFilterAt(jsonAuthenticationFilter,UsernamePasswordAuthenticationFilter.class);
        // http.userDetailsService(userDetailsService);
    }

    @Override
    public void configure(WebSecurity web){
        web.debug(true);
    }
}
- PostMan으로 테스트 해보면..
- 인증처리가 정상적으로 이루어져서 /로 redirect 되는 것을 확인할 수 있다.


블로그의 정보
57개월 BackEnd
BFine